Friday, October 10, 2014

Xbox Controller Doughnuts


These are doughnuts that look like simple Xbox controllers.
I bought some frozen roll dough.  This kind though, was in a square shape instead of a ball.  When the dough was thawed, I cut out a small rounded triangle from the top and a wide rounded triangle from the bottom.  I made sure the edges were rounded before letting them rise a bit and then fried them in some oil.
I made a simple glaze of milk and powdered sugar.  I put a cooling rack in a big cookie sheet and placed the doughnuts on them.  I Then poured the glaze over the doughnuts.
(You can tell that the glaze is pretty thin.  If you want a whiter looking doughnut, you can put more coats on.)
Before the glaze dried, I placed the "buttons" on.  The A, B, X, and Y buttons are mini M&M's and the other knobs are normal M&M's.  When the glaze dries, they are pretty easy to handle.  Yum!


Monday, September 1, 2014

Monopoly Cake


My son wanted a Monopoly cake for his birthday.  He also wanted caramel in his cake.  So I made a southern caramel cake and then made the board out of chocolate discs.  The cake is a 13x13 inch square cake.

In my home we have the nostalgia version of Monopoly.  So I found images online of the corner squares, chance, water works, electric company and the train for the rail roads that matched that version.  Make sure you flip the image when you do any kind of transfer for a cake.  If you do not, then it will look backwards when you put it on the cake.  I made the outline of the property spaces in Microsoft Word.  The community chest, income tax, and luxury tax spaces were just blank rectangles I also made in Word.

I printed all the images out and put the paper under some wax paper.  I then outlined everything in black chocolate.  So everything is the main outline, the question marks, the GO word and arrow, everything.  When that hardened up, I then filled in all the colors except the main creamy off white.  All the other colors need to harden before filling in with the off white color.  After everything was filled in and hardened, I had 40 little rectangles.  I gently peeled off each piece and placed it back in the wax paper in the order I wanted for each side.  I divided them into 4 groups.  In group 1 I started with the GO space and went to the last property space in the line.  Group 2 had the Jail space to the last property space in that line.  Group 3 was free parking to, yes, the last property space in that line.  And group 4 was from Go To Jail to, you guessed it, the last property in that line.

I thought it would be easier to arrange 4 long pieces on the cake and 40 individual pieces.  So I flipped each piece back over and arranged each group into its own line, but backwards.  The Go space above was placed as the first piece on the right of the line.  Remember, the top of the space is facing the wax paper, so I had to arrange it backwards so it will be right when I flipped it over.  The edges were not strait, so there were gaps between the spaces.  To remedy this, and make the chocolate stronger, I melted black chocolate, pipped it around the edges, and smoothed it all over.  When I was done, I had 4 stronger pieces in total.  With those 4 pieces on the cake I had a 9.5 inch square left in the middle to cover.  I did not want thick chocolate, because it would then be hard to cut into.  So I drew the size of square I needed on one side of wax paper.  I flipped it over, put in on an upside down cookie sheet, and used the same color of chocolate that is the background for the spaces to make a thin square.  I then piped red chocolate words for the middle square.  With the 4 long pieces off the cake, I kept the thin chocolate square on the cookie sheet and flipped it over onto the cake.  I then took off the cookie sheet and gently peeled the wax paper off.  Next the 4 long pieces were put on then I placed the red chocolate words.  And that is it.  All that is left is eating it!!


Friday, July 18, 2014

Animal Cookies


I took my my boys to a free day at the zoo.  (Which I will never do again.  It was a madhouse!)  I wanted to bring some fun treats and I had 3 cookie cutters that I wanted to try.  And yes, you do not find dogs, like my cookie, at the zoo, but I wanted to try it, so I did!  You will notice the the faces do not look exactly the same as on the cookies cutters.  That is because when I filled the face i could no longer see the imprints of the face.  But I looked at them, and, for some I changed a little as i put the faces on.


So I baked shortbread sugar cookies and used these cookies cutters.  The cookies got bigger in the oven a bit, but I was able to see the lines still.  Lets start with the monkey:

To keep all the sections separate, I had to do one section at a time.  More than one section can be done at once if none of the edges touch each other.  By the way, I am using royal icing.  I made both vanilla and chocolate icing.  I started with the top of the head, back arm, and the back leg.  After an hour, it was hard enough to move onto other sections.  I mixed some of the chocolate with the vanilla that was tinted a light yellow to get the lighter brown color.  I then filled the face and front leg.  Next I did the front arm.  Then the Tail and hands.  I then let it all dry overnight.  The next morning I used some edible markers to draw the face.

Now the lion:
For this animal, I tinted some of the vanilla royal icing yellow and some orange.  I was able to start by outlining and filling the face and back legs.  When those were done i did the front legs.  After all the yellow was dry enough, I filled the mane with the orange and then let the whole cookie, dry overnight.  I used the chocolate royal icing the next morning to make the face.

Dog:
I filled the head, front leg, and the tail.  Next came the ears and the rest of the body.  Now to get the spots, as soon as I was done filling the body part, I put a few dots with the brown and light brown icing.  It is called wet on wet royal icing technique.  I did this same technique for the brown eye.  When the cookies was all done, the face was hard enough to pipe a nose.  I bet you can guess what I did next, yes, let it dry overnight.  And yes, I used the edible markers for the rest: eyes, mouth, and toes.

I made enough for each of my boys to have one of each and they loved them!  It was a fun trip.  Next time, though, I will go on a different day!


Friday, July 11, 2014

Ruffle Dress Cake


I wanted to make a cake that looked like a dress, but was not a dress cake, if you get my meaning.  This is actually a rice crispy treat cake with whipped ganache frosting.  The ribbon and rose are Tootsie Roll.  I made rice crispy treats and put it in 2 - 6 inch cake pans and 2 - 4 inch cake pans that were sprayed with cooking spray.  When they firmed up, I just took them out and pressed the 6 inches together and the 4 inches together.

I made the ganache by mixing Wilton Candy Melts together.  Mostly white with some orange and pink melts.  After pouring the cream on the melts and letting the chocolate melt, you stir it and make sure it is mixed together and let it set up.  After that you just whip it up with some beaters and you get whipped ganache.  I smoothed on ganache on each tier.  The bottom tier ruffles are made with the Wilton 104 rose tip.  With the cake on a turn table and the ganache in a frosting bag and the tip attached, put the bigger side of the tip closest to the cake.  I started at the bottom and made an up and down motion while I turned my turn table.

I took about  8 Tootsie Rolls, one for the center and then each petal.  Each Tootsie Roll was formed into a ball and then flattened out.  I rolled one up for the center and then just placed a flattened circle, or petal, on until it looked how I wanted.  For the ribbon I took about 15 Tootsie Rolls and mushed them together and then rolled it out and used a pizza cutter to cut the sides.  I made it the width of a ruler, so I just placed that on the flat Tootsie Roll and rolled the cutter along the longer sides until i reached the length I needed.
*Hint* to find the length you need, take some wax paper and place it where the ribbon will be and then use an edible marker to mark where the wax paper meets.

I took the Tootsie Roll ribbon and wrapped it around the bottom of the top tier and then place the top tier on the bottom one and done!!

Friday, June 6, 2014

Father's Day Cake: White Shirt Cake


This is a 9x13 cake, dirty iced with frosting, and covered in marshmallow fondant.  For the collar, I used a pizza cutter to cut out a rectangle and then cut the top corners off to make pointed edges.  Arrange the collar on some paper towels and prop it up with more paper towels and let air dry over night (The collar can be done in advance).  The pocket is a square piece of fondant with a thin triangle piece on top.  "Glue" it on the cake with water and a food safe paint brush.  Place the collar on the cake and "glue" with water as well.  Pipe blue frosting in shape of a tie and use an offset spatula to smooth it out.  Then take yellow frosting and pipe "Happy Father's Day!"  To make it look even better, get a cake box and put the cake in the box with some white tissue paper to look like a brand new shirt!


Saturday, May 31, 2014

Baptism Cake


A friend wanted a cake for her son's baptism.  So I baked a two layer vanilla cake with chocolate fudge frosting for the filling.  I smoothed the vanilla buttercream icing on the cake and stuck it in the freezer to harden a bit.  I printed a free picture of a boy being baptized.  I then put the picture on a cake dummy and used a toothpick to poke holes along all the lines.  I then took my cake out of the freezer, placed the holey picture on top of the cake where I wanted it, and gently rubbed  the picture.  When I picked up the picture, the holes imprinted all the lines from the picture onto the cake.  I then used the fudge frosting and a size 2 round tip and traced along the lines.  I then used a size 14 star tip and filled in the picture with a bunch of stars.  White vanilla frosting for the clothes and peachy vanilla frosting for the skin.  I then used the fudge frosting for the hair.  When that was done I used a size 32 star tip and the vanilla buttercream for the top and bottom border.  Done!  


Friday, April 25, 2014

Circus Cake


This is a cake my son requested after he looked through my copy of the Wilton 2011 Yearbook.  I did not have the time that I would need to make it look exactly like the cake in the yearbook, so I made it my way.  The cakes in the yearbook had fondant covering them with fondant animals and ring master.  I covered this cake with store bought vanilla frosting and made the animals from chocolate.  The ring master is actually a Little People toy that I have.  One of the cakes in the yearbook had the orange and the light orange lines up the side of the cake so that is why I did that on this cake.  I also pipped a shell border on the bottom and a swag on the top of both tiers.  I found some images of animals, printed them off, and taped it under some wax paper on a cookie sheet.  I first did the outlines and other parts of the animals in black chocolate and let that harden.  I then filled them with color and let those harden.  Some of the parts were thin, so I took some white chocolate and covered them so it would all be one solid piece.  When those where all hardened, I peeled them off and the bottom looks like the picture!!  After placing the animals on, I put the ring master on top and I was done!!

Friday, April 18, 2014

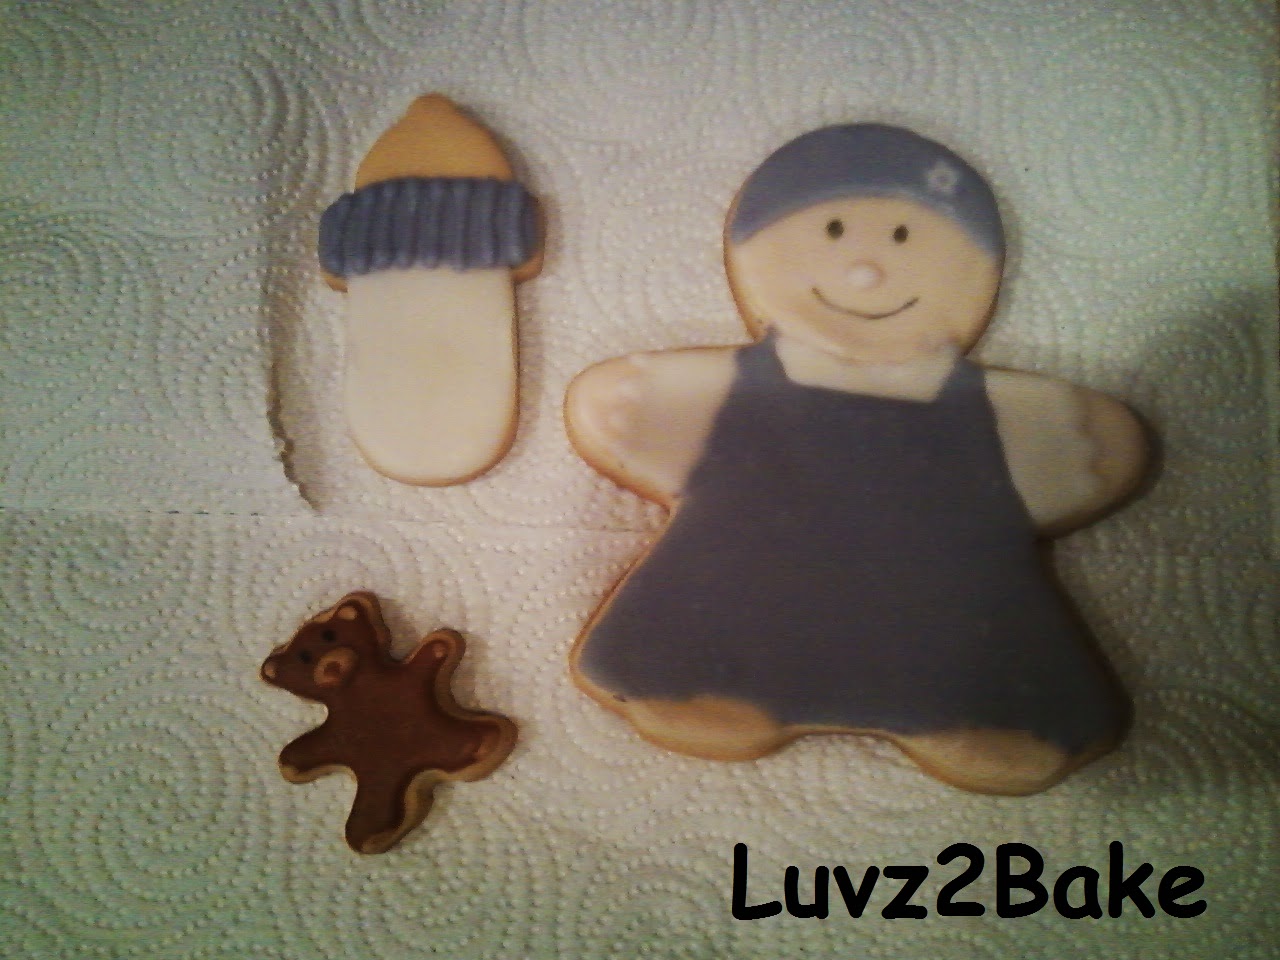
Baby Doll Cookie


Here are some cookies I made with a baby doll toy in mind.  I made cut out cookies with royal icing.  I used a gingerbread girl cookie cutter from Wilton's 101 cookie cutter set.  The bottle is just a bottle cookie cutter and the teddy bear is a mini cookie cutter.  I loved how they turned out!

Saturday, April 12, 2014

Spring Flowers

Here is one of the first cakes I ever made.  It was a cake I made just because I wanted too!

It is a normal cake box mix and canned frosting.  I baked two 9x9 cakes and trimmed one of them down to a 6x6 cake.  I frosted them with white icing and stacked the 6 inch cake on top of the 9 inch cake.  I then took a toothpick and made lines to look like white bricks.  I know it is not the best, but remember, "one of the first cakes I ever made".  I made some frosting flowers on some wax paper and put them in the freezer to harden.  I then tinted some frosting green and used the grass tip to pip grass on the top of both levels.  When the frosting flowers were hard, I just carefully picked them up and put them on the cake.  I liked that I could make flowers out of soft frosting that tasted good, but then be able to pick them up with my hands and arrange them on the cake.  And there you have it!!

Friday, April 4, 2014

Boutique Treats

These were some free treats for a boutique!  They were for the customers so they could have a treat while perusing the crafts.  The flyer was green, blue, white and brown.  Hence the colors of the treats.


These are brownies that I formed into balls.  They are like cake balls, but you do not have to add frosting to make it stick together.  I put them in the fridge to chill and then just melted the chocolates.  I then dipped the chilled brownie balls and put them on wax paper.


These are Melt in Your Mouth Sugar Cookies.  The cookies are all the same except the brown have cocoa powder added with the flour.  The green and blue are just sprinkles that I rolled the dough into before baking.


These mini cupcakes are all from cake mixes.  The Key Lime and Blue Raspberry are actually new mixes from Pillsbury.  The blue and green frosting are also the same flavors from the same brand.  I just put the frosting in a star tip and put some swirls on them.


These are grapes and blueberries in 2 oz serving cups.  I wanted to make sure to have an option for those who did not want something with sugar.


I displayed them on disposable doilies and had some flowers in a small vase.  I think it turned out nice!

Melt-in-Your-Mouth Sugar Cookies

This is from the Better Home and Gardens New Cook Book 12th edition.  These are really good!  They have some other really good recipes check it out here!!

1/2 cup of butter, softened
1/2 cup of shortening
2 cups of sugar
1 teaspoon of baking soda
1 teaspoon of cream of tartar
1/8 teaspoon of salt
3 egg yolks
1/2 teaspoon of vanilla
1 3/4 cups of flour (all-purpose)

    Beat butter and shortening until blended.  Add in the sugar, baking soda, cream of tartar and salt and mix well.  Make sure the side of the bowl are scraped.  Mix in the egg yolks and vanilla.  Add as much flour as possible using the mixer, then just mix the rest with a spoon.

    Roll the dough into balls about 1 inch in diameter and place on an ungreased cookie sheet 2 inches apart.  Bake in a preheated oven of 300 degrees for 15 minutes making sure the edges do not brown.  Of course if the cookies are smaller or bigger, the time will need to be adjusted.  After letting the cookies cool for about 1 minute, put them on a cooling rack  and allow them to continue to cool.

This recipe will make around 60 cookies

Sunday, March 30, 2014

A Mario Party: More Goodies

As you may have read, my son wanted a Mario Party for his birthday.  I have already posted tutorials for his Lakitu cake, King Bob-omb candy and the Cheep Cheep candy.  Here are the rest of the goodies!

I used napkins that looked like Toad and Blue Toad.  The blue Kool-Aid is for the Blue Toad as well.  The rice crispy treats are grey tinted for Whomp.

These are sandwiches made from rolls to look like Wiggler's body.  When the rolls were ready to go into the oven, I used a pastry brush to color them yellow with a dyed egg wash.  If you wanted to, you could make the rolls from scratch and dye the dough yellow.  After the rolls were done, I mixed some food color with water.  I used a food safe paint brush to make a orange circle and then a brown ring around it.  I then cut them and filled them with meat and cheese!

These are just mini powdered doughnuts for "Boo's Doughnuts".

This is a mixture of Whoppers and Milk Duds for Chain Chomp Kibble.

These are Bowser Jr. Jell-O Cups.  Green Jell-O in small plastic cups and then some spray whipped cream.  Bowser Jr.'s shell is green with white spikes.
Yum!!


Friday, March 21, 2014

A Mario Party: Cheep Cheep Candy

Here is another Mario inspired treat that I made for a birthday.  They are called Cheep Cheeps, which are fish in the Mario world.

Cheep Cheeps, as you can see, have red bodies, white fins, yellow dorsal and tail fin, a pink mouth and big eyes.
I made these entirely out of Starbursts:
Red and Yellow from the Original
Pink and Yellow (looks white) from the Tropical
*If your candy is hard, just unwrap it and warm it in the microwave on a plate for a few seconds*

I got a Wilton gum paste tool set for Christmas and so I used some of those to help with the fish.  I shaped the body out of the red candy and made it a 3D oval shape.  For the mouth I made little pink balls and made a whole with the small modeling stick from the tool set.  The eyes are a oval that I just pinched together a little in the middle and black food writer pupils.  The Dorsal fin is an oval that I embossed with a shell tool.  The tail fin is a circle that I pinched three points from.  Finally the side fins are ovals with one end being smaller than the other.  The smaller end connects to the fish and I made some lines with the pallet knife in the other side of the oval.  Since it is all the same candy, it stuck together just fine.  If you are having a hard time sticking them together though, a little bit of water will help.  I ate one and loved the combination of flavors!  So good!

Thursday, March 20, 2014

A Mario Party: King Bob-omb Candy

Here are some hollow chocolate balls that look like King Bob-omb.  And there is a secret . . . Mini chocolate candies inside!!!

First I melted some black chocolate discs, like the Wilton Brand.  I coated the sides of a silicone cake pop pan with 2 coats, letting it harden between each coat.  Slowly peel the sides of the silicone away from the chocolate.  What I had was a bunch of half circles.

The edges are uneven and the best looking were the ones where I heated a frying pan and evened the edges out.  Another plus is that this make the chocolate melted a bit and sticking the two halves together is easier!  So even the edge of one half circle and then fill it with mini chocolate candies.  Then even the edge of the other half circle and stick it to the first one.  After holding them together for a bit, I then used my finger to smooth where the halves met and it looked perfect!  Then put the candy filled chocolate balls in the fridge to chill.

Now comes the decorating.  I put a dab of melted black chocolate on some wax paper and placed a chocolate ball in it and held it there for 10 seconds.  Now it will not roll around.  I used the yellow candy in the Original Starburst for the crown and the yellow candy in the Tropical Starburst for the eyes, mustache and hands.  The Tropical Starburst yellow is actually white looking when you get the wrapper off.  The stickiness of the Starburst made it stick to the chocolate ball very easily.  I did put some melted chocolate on the bottom of the crown since it was a bigger piece of candy to stick on.  And they are done!

Here is another kind.  I made this the same way, but it is Lakitu's spiny egg.

Sunday, March 16, 2014

A Mario Party: Lakitu Cake

Hey!  Sorry it has been awhile.  I sprained both of my thumbs, yes that is what I said, both of them.  After that I was immersed in my child's birthday party plans.  Things are less busy and painful, so I can post!

So my child wanted a Mario Party Birthday.  And what does he as for his cake?  A Lakitu Cake.  For those of you who may not know all things Mario, Lakitu is a little guy with a shell that rides a cloud and throws little spiky balls (called spiny eggs) at Mario.


For the cloud I baked two 9 inch cakes and after filling it with butter cream, I marked the top of the cake into thirds.  I carved along the lines to make them deeper, made the top edge of the cake rounded and also carved the sides to make it smaller.  I took the leftover cake, added some butter cream and mixed it together, like cake pops.  I then made a few half circles, about as bit as my palm, that I added to the sides and top of the cake.  I thinly iced the cake in butter cream and then draped it in white modeling chocolate.  Using a black edible Marker, I added the eyes and smile.

For Lakitu, I took a wooden dowel and molded his body out of rice crispy treats and covered in yellow modeling chocolate.  I took some of the leftover white modeling chocolate and colored it a bit to make it a light ivory color.  I rolled it into an oval and cut lines across with a pizza cutter.  I then used water to "glue" it to his tummy.  I made his arms and head out of rice crispy treats and covered them with yellow modeling chocolate as well.  I attached the arms to the body with some toothpicks.  I put the head on the top of the dowel.  I had some leftover brownie, so I made a brownie pop, dipped it in red chocolate and put white chocolate chips to create a spiny egg.  I placed it on the cake under one of his arms.  Since it was a brownie pop, I pushed the stick into the cake to hold it in place.  I put some paper towels under his arms and behind him and let him dry overnight.

Earlier I had made a shell using green chocolate and the Wilton Dessert Dome Candy Mold.  I wrapped the wider end with white modeling chocolate and created the lines with melted chocolate.  Once that was dry, I dabbed water on the modeling chocolate and placed it on his back.  I then pushed in 4 toothpicks to secure it.

I made his goggles, the goggle strap and his hair with black chocolate.  I then used food writers to draw his eyes and mouth.  It was a lot of fun to make!

More to come!!


Thursday, February 27, 2014

Hamburgers


So these are some brownie Hamburgers that I made.  It had actually started with a bad choice in pans.  I had baked blonde brownies in the Mini Wonder Mold Pan from Wilton.  Of course the top was too pointed so I cut it off.  But then you could see the lighter, inside color of the brownie.  That was when I decided that I would make them look more like a gourmet hamburger.  I made a pan of normal fudge brownie and cut out the "patties" with a circle cookie cutter that was close to the same width as the blond brownies.
I then made tomatoes with red chocolate.  I melted it in a Make 'n Mold squeeze bottle and pipped, on wax paper, a wagon wheel.  So a circle and then I pipped lines like I was cutting a pizza into eighths.  Then it went into the fridge to chill.
I made some butter cream frosting and divided it into thirds.  One I left white (miracle whip), one I colored orange-yellow (cheese) and the third I colored a light green (lettuce).
After cutting the blonde brownie in half so I could have a top and bottom bun, I spread white frosting on the inside of both buns.  I took the bottom bun and pipped green frosting with a small rose tip, rounded side out.  I made a wavy motion as I pipped along the edge.  Then I placed the fudge brownie on top of the green frosting.  I then used a small basket weave tip to pipe the cheese square.  Use the smooth side as opposed to the lined side.  Then the chocolate "tomato" was placed on the cheese and finally the top bun on top of that.  I then used a chef knife to cut each hamburger into fourths.

I have since then made different variations.

I used orange Starbursts for the cheese and a metal bowl for the bun for this cake

 I baked the blonde brownies in a 9X13 pan and used a PLASTIC circle cookie cutter for the hamburger bun tops and a metal cutter for the bottoms.  I found that since the plastic is not sharp is domes the brownie as it is getting cut!
Enjoy!!

Monday, February 17, 2014

Paper Mario Star Spirit Pancakes!

In my previous post I did heart pancakes.  While I was cooking them I decided to try other shapes using cookie cutters.  I have some Mario fans in my home, so since I had all these colored pancake batters for the hearts, I decided to make the Star Spirits from Paper Mario.
 
So I had two sizes, the bigger one for the Star Spirits and the smaller one for little Twink!


You can check out my Hear Pancake post to see how to prepare the batter and cookie cutters.  Here is the finished Stars!

 
You can also just make yellow stars and then use 2 normal or mini chocolate chips for the eyes.  Just push the chocolate chips into the star point side down.